|
Duncan23
|
 |
« on: 17 August, 2020, 03:01:23 PM » |
|
Hi I thought I'd introduce myself and this car. I had a few Lancias in the past - a couple of Beta projects that never made it to the road and a Dedra Turbo that I loved and sold on for a more economical daily. After a few years with just a modern car I found myself with the time and space for a project, something that would fit in the (smallish single) garage and I could improve, but wasn't too decrepit or too precious to work on. Hence I bought this Y10 from an advert on this website a couple of weeks ago. It's a 1993 GTie in LHD, I think it was originally bought in Brussels, then it went to Cyprus and finally it came over here a couple of years ago. While in Cyprus it had aftermarket air-con installed - it's been partially removed, but the dashboard is a bit of a mess (I think part of it was cut about and it's cracking in places), and the associated wiring could do with being removed. It drives OK, though it's not been used much, so it could do with the cobwebs being blown out and some fresh fuel, and I don't see much rust when poking around underneath. The paintwork is not great - part of it has clearly been resprayed at some point in the past, the roof is a bit faded, and the bonnet has some cracks showing the old paint (the spare wheel has a 175 70 R13 tyre and apparently has caused some marks on the bonnet when someone tried to shut it). The sides aren't too bad, but the bumpers have some black paint flaking (again, showing what is presumably the original underneath). This is it, shortly after being washed last weekend: 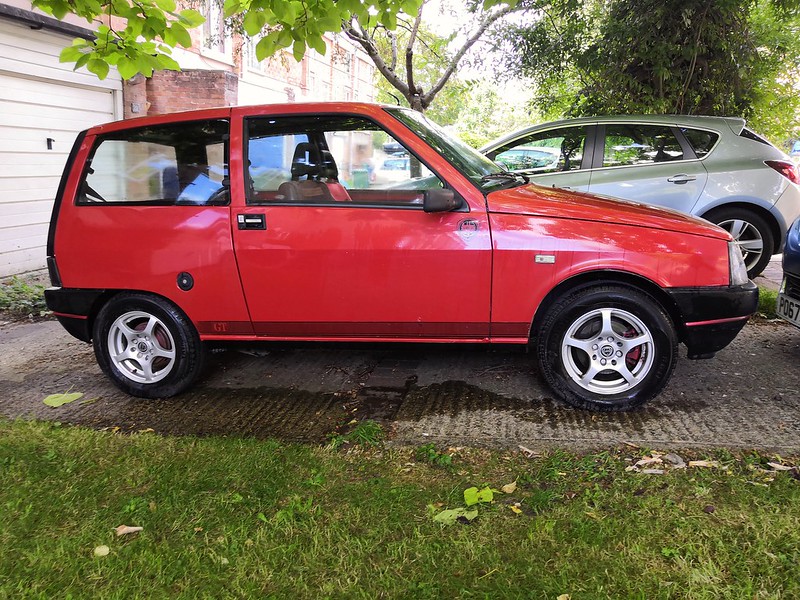 2020-08-17_03-44-00 2020-08-17_03-44-00The seats are wearing covers because the base (at least on the drivers side) is quite frayed, and the carpet and alcantara are an indeterminate grubby colour, so I need to give the interior a good clean before I do anything else in there. At some point (maybe this winter) I shall have to take much of it apart and reinforce it or replace the bits that are cracked. Obviously the main dash panel and probably the central one with the switches and heater vents are different, but I assume the various hinged pieces are the same, just switched from left to right? I could do with getting my hands on a workshop manual or similar - does the club have one that can be borrowed or sections thereof photocopied? I shall post more updates when I've had a chance to give it a proper once over and take a bunch of photos (though I also need to finish clearing up the garage so it has somewhere to live). The plan is to make it as usable and enjoyable as possible, without spending too much money or focusing too hard on originality (it'll never be a concours car, and I wouldn't want one), and to have something to tinker with as and when I get the time. Thanks Duncan |
|
|
|
|
 Logged
|
|
|
|
|
lancialulu
|
 |
« Reply #1 on: 17 August, 2020, 05:12:41 PM » |
|
Hi Duncan
Welcome - Nice Y10GTie. Contact Chris Hopkins - librarian for workshop manual and or Frank Tierney who is the font of all things Y10!
Additionally the club has quite a few special tools for hire for this model. I am the contact. You can see a list of tools in the online library.
Tim
|
|
|
|
|
 Logged
|
Its not the winning but taking part! or is it taking apart?
Lancias:
1955 Aurelia B12
1967 Fulvia 1.3HFR
1972 Fulvia 1600HF
1972 Fulvia Sport 1600
1983 HPE VX
1988 Delta 1.6GTie
1998 Zeta 21. 12v
|
|
|
frankxhv773t
Permanent resident
 
Posts: 2247
|
 |
« Reply #2 on: 17 August, 2020, 07:44:33 PM » |
|
Welcome to the Y10 fold. I am the font of some knowledge but only on Y10 Fire, Trevor Nicosia is the man for Y10s having had upwards of 30 of them.
Cracked dashboards are a problem and there isn't really a fix unless you can find a second hand one in good condition. It's quite a job to swap one which is why I am living with the crack in mine. I do have pictures of what's behind the dash if you do decide to do something about it. As far as I know bumpers should be bare plastic so if you have flaking paint it's probably been done to cover up fading of the plastic. I use Maguires black trim detailer to good effect to keep my bumpers black. I think your bumpers might be Y10 Turbo which may be worth a few quid with that red insert.
One of the joys of Y10s is that parts are cheap and lots of mechanical and electrical bits are still available new. I have dismantled a couple so have some spares and am always willing to help get another Y10 fixed up.
Where abouts are you located?
|
|
|
|
|
 Logged
|
|
|
|
|
Duncan23
|
 |
« Reply #3 on: 18 August, 2020, 07:32:00 AM » |
|
I'm in Oxford. In theory there's a local meeting on Thursday, but I don't know if it's on (or if I can go). I see it splits with the Berkshire group - I'll contact Chris Hopkins for the workshop manual and also to find out about that meet.  When I talk about dashboard cracks, I'm talking about cracks in how it is assembled, rather than the cosmetic ones I had on my old 924. Specifically, if you push any of the buttons in the central part of the dash (eg the fog lights), the whole button set moves inside the dashboard. I'm also missing the alcantara cover for the stereo, and I think the aircon install basically wrecked the glovebox. Just poking around on eBay I'd noticed that there were quite a few spares available new, and also that they are really cheap!  It's a nice surprise after my last classic (a Porsche 924 Turbo), where most stuff was available, but everything cost a fortune! Thanks Duncan |
|
|
|
|
 Logged
|
|
|
|
nyssa7
Megaposter

Posts: 211

|
 |
« Reply #4 on: 18 August, 2020, 07:44:16 AM » |
|
Not sure from that angle whether the bumpers re from a Turbo, need ring and rear views to check the front has the additional cooling slots and the rear has what looks like a spoiler for going very fast backwards 😂
But I don’t live far from you, Princes Risborough, and have a garage full of odds and ends Y10
|
|
|
|
|
 Logged
|
2000 kappa coupe 20vt
1996 kappa saloon 20vt race car
the "Yntegrale"
1999 Lotus Elise S1
2016 AMG GTS
Y10 Advisor
|
|
|
|
Duncan23
|
 |
« Reply #5 on: 18 August, 2020, 08:07:50 AM » |
|
Front and rear bumpers: 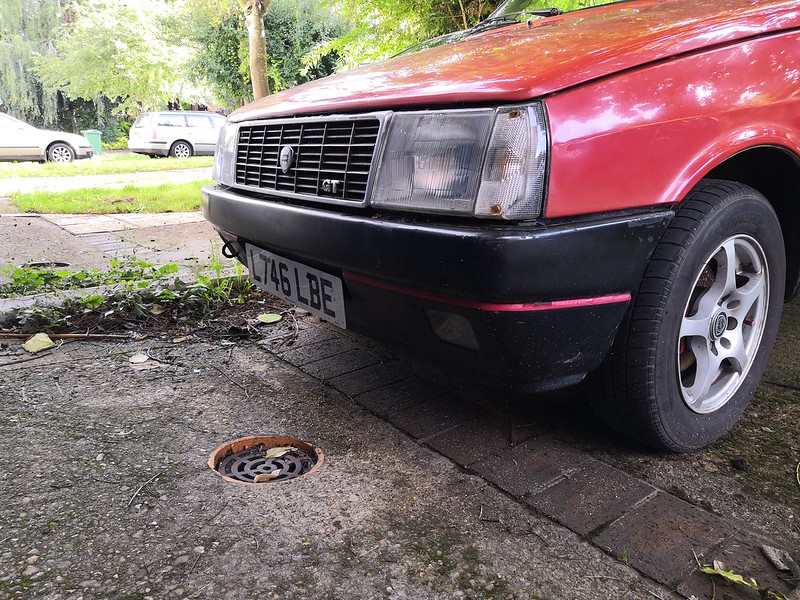 IMG_20200818_085706 IMG_20200818_085706 by duncancmartin, on Flickr  IMG_20200818_085717 IMG_20200818_085717 by duncancmartin, on Flickr And the interior - all the gaps and crazy angles show what needs sorting. 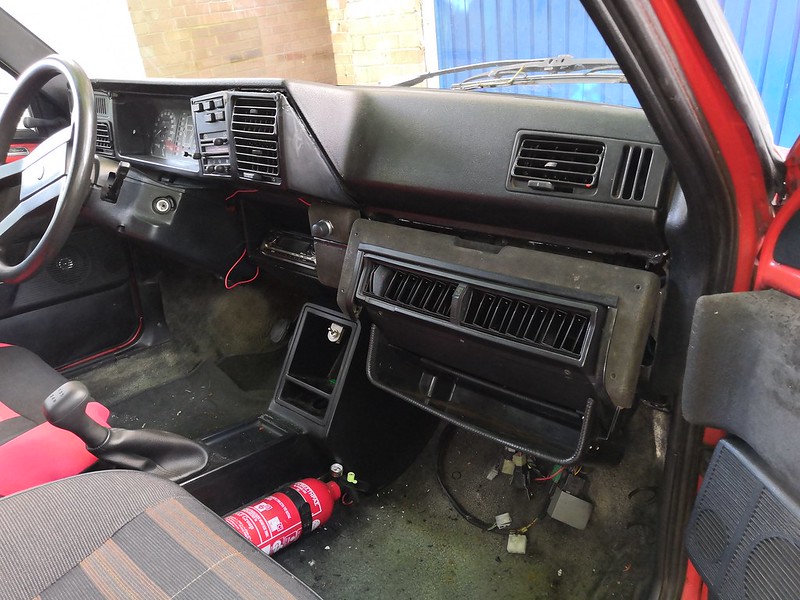 IMG_20200818_085734 IMG_20200818_085734 by duncancmartin, on Flickr 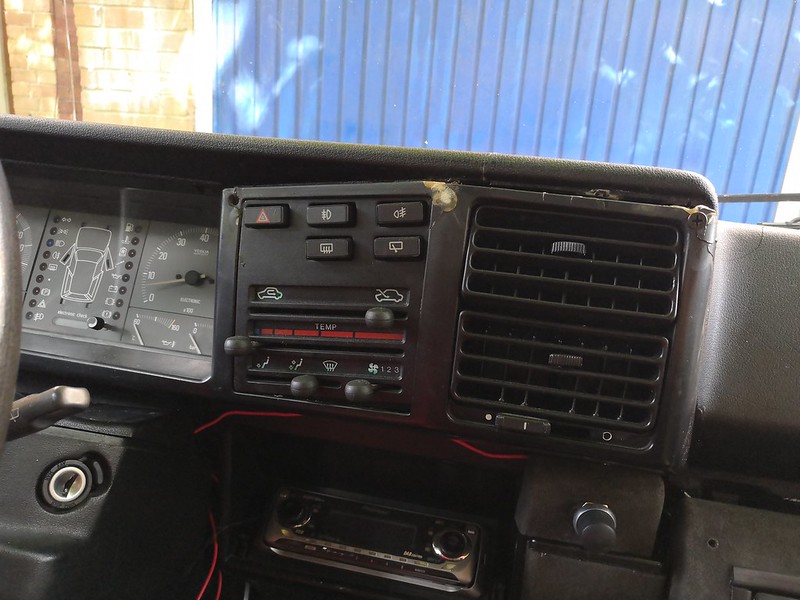 IMG_20200818_085747 IMG_20200818_085747 by duncancmartin, on Flickr  IMG_20200818_085742 IMG_20200818_085742 by duncancmartin, on Flickr I have a folder full of history as well, but it's a mix of French, Greek (I think), and English. I need to go through it and put it in chronological order, but I'm not sure it's going to tell me anything new. Oh, and it came with a nice shiny grille, so I might put that on instead of the current peeling one. Don't know if I can swap the GT badge over though. |
|
|
|
« Last Edit: 18 August, 2020, 08:15:58 AM by Duncan23 »
|
 Logged
|
|
|
|
frankxhv773t
Permanent resident
 
Posts: 2247
|
 |
« Reply #6 on: 18 August, 2020, 10:05:24 AM » |
|
It looks like it's not a turbo bumper then, I checked my pictures and could only see the red insert on turbos but specifications vary so much. As I said, nyssa7 (Trevor) is the man with the real knowledge.
|
|
|
|
|
 Logged
|
|
|
|
fay66
Permanent resident
 
Posts: 6234
|
 |
« Reply #7 on: 18 August, 2020, 10:14:37 AM » |
|
It looks like it's not a turbo bumper then, I checked my pictures and could only see the red insert on turbos but specifications vary so much. As I said, nyssa7 (Trevor) is the man with the real knowledge.
There were no red stripes in the bumper of my 1989 GTie,. Dash besides being Lhd is different on the late Y10's. Spare wheel should be a steel wheel, and as someone found out, an alloy wheel doesn't fit! I tried to do similar by putting an alloy wheel in the spare wheel well on my Delta HF turbo to find it would only fit if deflated  Brian 8227 |
|
|
|
|
 Logged
|
Own 1966 Fulvia 2C Berlina since 1997, back on road 11-1999.Known as "Fay"
2006 Renault Megane 1 5 Dci Sports Tourer
Dedra Technical Adviser
|
|
|
nyssa7
Megaposter

Posts: 211

|
 |
« Reply #8 on: 19 August, 2020, 06:08:29 AM » |
|
Looks like GTie spot lights so guess someone has adde red bits, are they painted? Turbo has “wire” red stripes added to the plastic. And rear upper not from a Turbo either
Reckon when the air con was working the passenger would have frozen 😂
|
|
|
|
|
 Logged
|
2000 kappa coupe 20vt
1996 kappa saloon 20vt race car
the "Yntegrale"
1999 Lotus Elise S1
2016 AMG GTS
Y10 Advisor
|
|
|
|
Duncan23
|
 |
« Reply #9 on: 19 August, 2020, 12:35:23 PM » |
|
I'm not sure if the bumpers have the red painted on - it's quite possible given the black is mostly paint. I figured the first thing to look at on the inside is the aircon area. I also wanted to see what the alcantara looks like when cleaned up a little (still dark grey it turns out). So I got the piece of dash around the aircon unit, and it just came off in my hand - it wasn't attached at all! It looks like the plastic around the glovebox area has just been cut apart - could someone post a picture of what this should look like (with the glovebox open)? 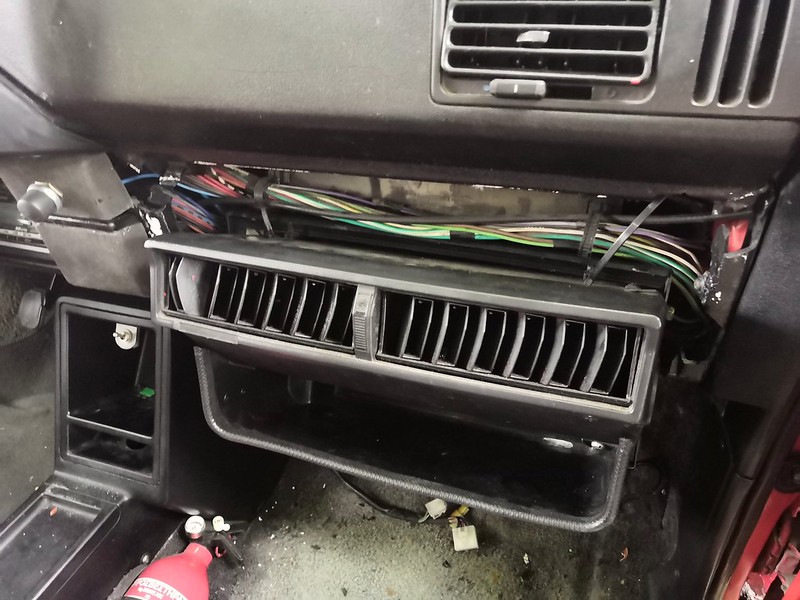 2020-08-19_01-20-51 2020-08-19_01-20-51 by duncancmartin, on Flickr I'm guessing I'm going to have to chase up this piece of the dash with a continental breaker, if it's not part of the whole moulded unit (in which case maybe I need a whole dashboard?).  This looks like the door I have a chopped up version of: https://www.ebay.co.uk/itm/Door-Dashboard-Instrument-Lancia-Y10-Original-182278360/174113563163?fits=Model%3AY10&hash=item2889fa221b:g:mVQAAOSwpUtd5oJx I wonder if the UK version is the same door? |
|
|
|
|
 Logged
|
|
|
|
frankxhv773t
Permanent resident
 
Posts: 2247
|
 |
« Reply #10 on: 19 August, 2020, 12:58:29 PM » |
|
I've taken some pictures of my spare dashboard which probably gives you the best view of the structure. The supports either side of the central air vent are notoriously weak so I have done a close up of that bit. I've done the actual glove box from above and below too.
|
|
|
|
 Logged
|
|
|
|
|
Duncan23
|
 |
« Reply #11 on: 19 August, 2020, 01:05:02 PM » |
|
Thank you Frank - that's amazingly useful. Sadly, it confirms my fears - some of the plastic that has been chopped out is part of the main moulded dashboard structure.  I'll have to get the aircon unit out and see what's left - with any luck I can make a few steel brackets up that will allow a glovebox panel to cover the gaping hole (and maybe a small bit of alloy sheet to provide the box bit). On the bright side - if I can do all that relatively well, my new dashboard will be stiffer and sturdier than most!  |
|
|
|
|
 Logged
|
|
|
|
|
Duncan23
|
 |
« Reply #12 on: 19 August, 2020, 06:27:18 PM » |
|
I removed the aircon unit - it left a giant hole, a strange bracket and an assortment of wiring. 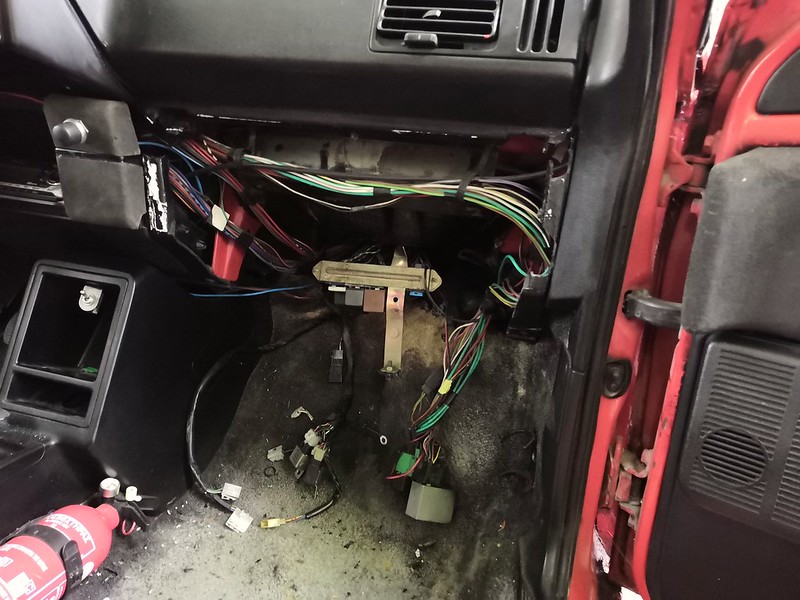 2020-08-19_07-16-40 2020-08-19_07-16-40 by duncancmartin, on Flickr Also, the alcantara piece above the ashtray is completely floating, and I've no idea what the dial mounted in it is for (the toggle switch below that is an extra fan switch to help with cooling in traffic). Typical that the most sturdy thing in the entire dashboard is the ashtray (and I don't smoke)! I will need to fabricate something or find myself another dashboard. Has anyone gone all motorsport and replaced the thing with a flocked aluminium panel? I also need to work out where all that wiring belongs (and which bits are unnecessary). I must get around to sorting out a shop manual. |
|
|
|
« Last Edit: 19 August, 2020, 06:29:30 PM by Duncan23 »
|
 Logged
|
|
|
|
frankxhv773t
Permanent resident
 
Posts: 2247
|
 |
« Reply #13 on: 19 August, 2020, 07:45:37 PM » |
|
There is a workshop manual just come up on e-bay. It says Volume 2 but probably has a lot of the later models stuff relevant to your car.
On the RHD car the fuse box is behind and below the glove box and would fit in a bracket like that. Which leads to the question of where is your fuse box?
The panel above the ashtray is where the electric window switches were on earlier models. Might the knob be something to do with the air-con as the actual unit didn't seem to have much by way of controls on it?
|
|
|
|
|
 Logged
|
|
|
|
fay66
Permanent resident
 
Posts: 6234
|
 |
« Reply #14 on: 19 August, 2020, 09:01:42 PM » |
|
There is a workshop manual just come up on e-bay. It says Volume 2 but probably has a lot of the later models stuff relevant to your car.
On the RHD car the fuse box is behind and below the glove box and would fit in a bracket like that. Which leads to the question of where is your fuse box?
The panel above the ashtray is where the electric window switches were on earlier models. Might the knob be something to do with the air-con as the actual unit didn't seem to have much by way of controls on it?
Think the series 2 manual only has the items changed with this model, but for everything else you still need the series 1 manual for everything else. Brian 8227  |
|
|
|
|
 Logged
|
Own 1966 Fulvia 2C Berlina since 1997, back on road 11-1999.Known as "Fay"
2006 Renault Megane 1 5 Dci Sports Tourer
Dedra Technical Adviser
|
|
|
|

