Dikappa
Megaposter

Posts: 559
|
 |
« Reply #75 on: 13 March, 2018, 06:56:08 AM » |
|
In my opinion a new oil seal will not help. I machined a groove in the bushing around the main shaft (it just slides on) as the shaft itself is drilled and will allow oil to the clutch release bearing (inside the shaft is a sort of 'oil pump' and a felt 'seal')
I also machined an extra oil seal in the nose of the alu housing you now removed
I blocked the shaft at the front with a screw and used a sealed support bearing.
All in all it is a weird design in my opinion...
There's pictures of this on a post about my B21.
|
|
|
|
|
 Logged
|
|
|
|
williamcorke
Rebel Poster

Posts: 718
B10
|
 |
« Reply #76 on: 13 March, 2018, 09:29:08 AM » |
|
Thank you Koen and Tim and to others who have written to me 'off-forum'. It's clear that I have stumbled (slipped!) on one of the more knotty technical problems with early Aurelias (as I'm told the later gearboxes are differently designed in this area), and while I am some way towards getting my head around the issues and work arounds, I'm not going to write this up until I've done some more work on it. Meanwhile, here's a link to Koen's informative thread on the subject from about a year ago. http://www.lancia.myzen.co.uk/forum/index.php?topic=9405.msg68683#msg68683 |
|
|
|
|
 Logged
|
'37 Aprilia
'50 B10
'53 B20
'68 Flavia Vignale
'55 Giulietta Sprint
S1 Land Rover
|
|
|
williamcorke
Rebel Poster

Posts: 718
B10
|
 |
« Reply #77 on: 23 March, 2018, 05:10:07 PM » |
|
Metalwork meets woodwork. Nobody Wins.That's the title of this instructive photo, which shows my attempt to compress the clutch unit using sash cramps and blocks of wood. The springs reached a point of compression some way off that required to get the giant circlip into its groove and refused to compress any further. Tightening the cramps just made the bed of the workmate bow and... I've called a friendly local garage and will pop over tomorrow morning to use their bench press. 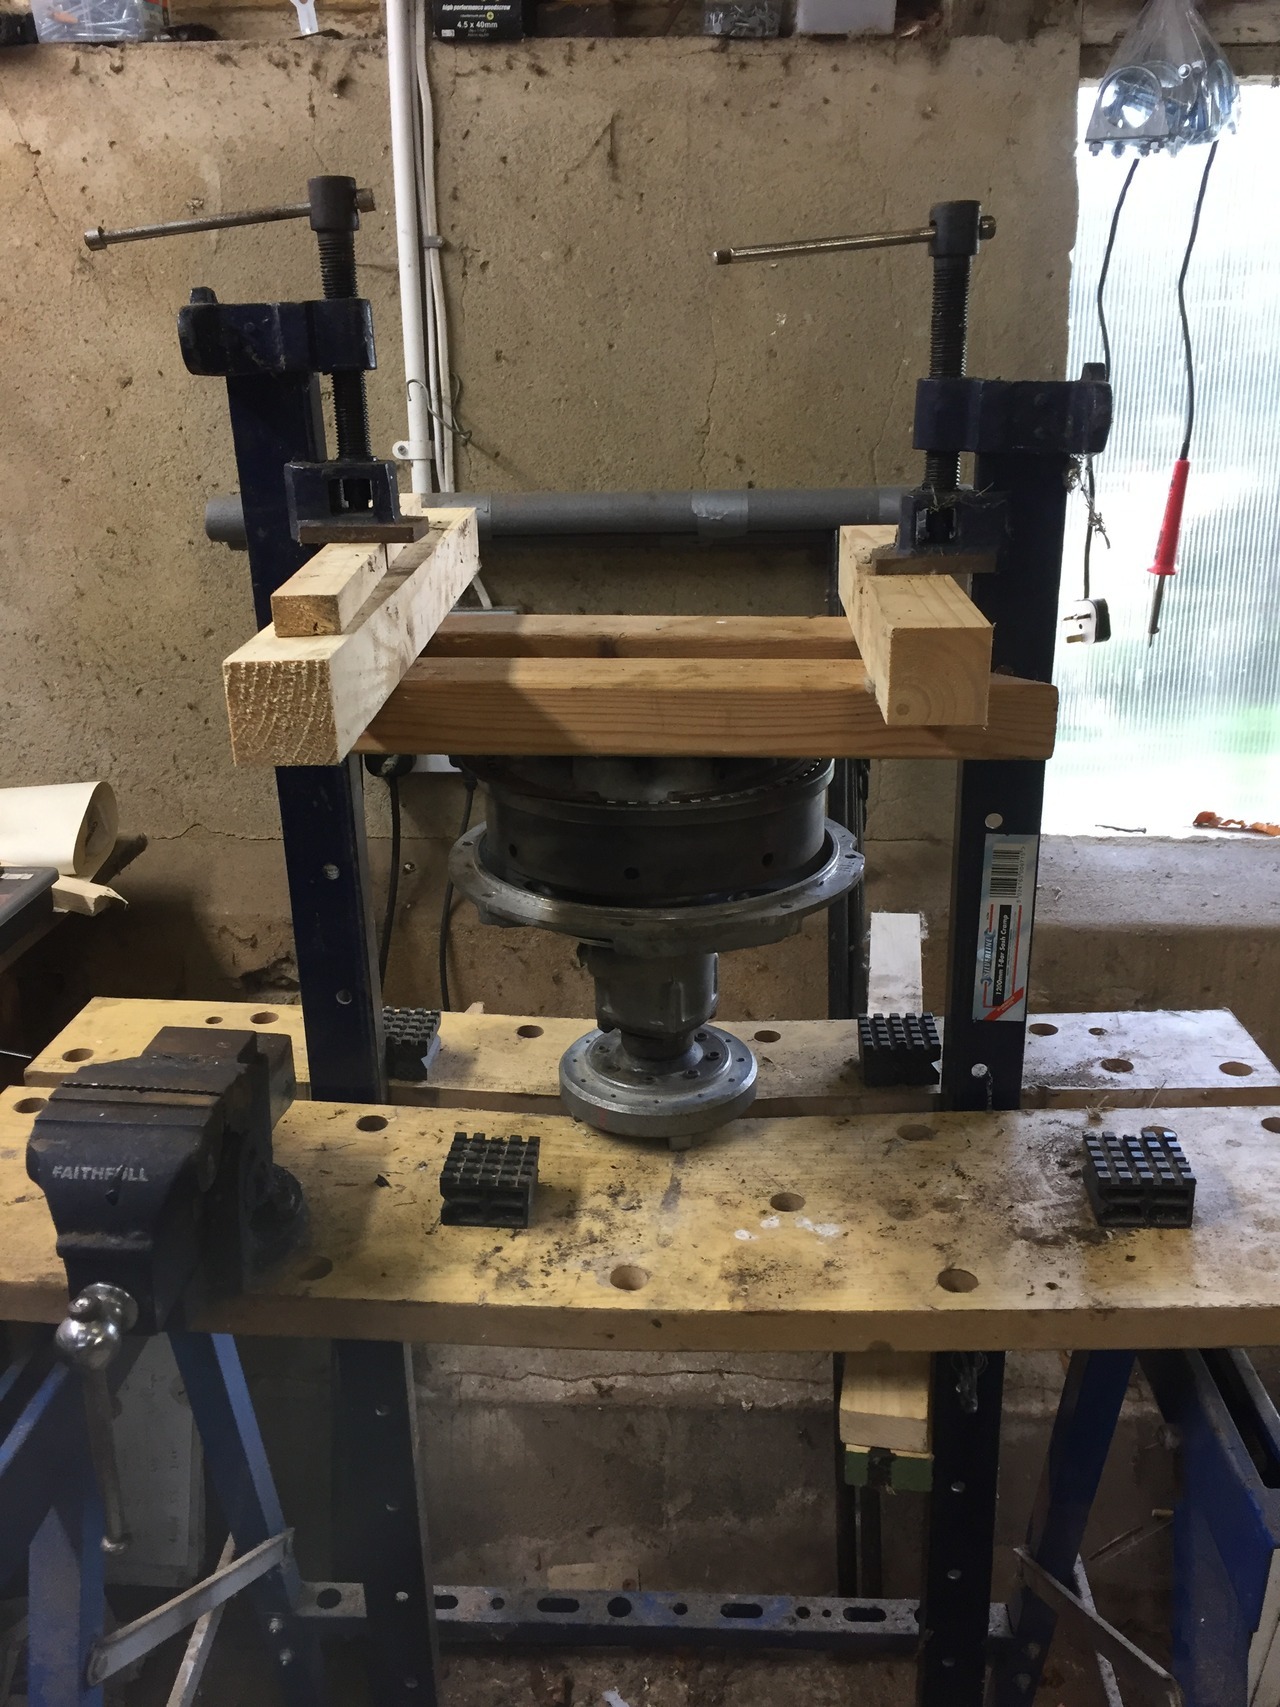
|
|
|
|
« Last Edit: 26 March, 2018, 09:40:22 AM by williamcorke »
|
 Logged
|
'37 Aprilia
'50 B10
'53 B20
'68 Flavia Vignale
'55 Giulietta Sprint
S1 Land Rover
|
|
|
DavidLaver
Permanent resident
 
Posts: 4388
|
 |
« Reply #78 on: 23 March, 2018, 05:30:31 PM » |
|
Alas I can't remember quite how but I did this several times with the box in the car on the BWE ramp.
|
|
|
|
|
 Logged
|
David Laver, Lewisham.
|
|
|
williamcorke
Rebel Poster

Posts: 718
B10
|
 |
« Reply #79 on: 24 March, 2018, 07:40:42 AM » |
|
Re Clutch assembly.
A kind correspondent from the USA has mailed me to explain that there are 3 regularly spaced holes in the aluminium back cover (between the 'spring bosses') through which you pass 6mm threaded bar or studs. Tightening them progressively - with some kind of bridge to brace the tightening nut against the bosses either side) will compress the springs. All this can be done as a separate unit before assembly, before the compression studs are removed. I'll get some suitable 6mm threaded bar today (none in my boxes of spare nuts, bolts and etceteras) and all should be well.
|
|
|
|
« Last Edit: 26 March, 2018, 10:34:55 AM by williamcorke »
|
 Logged
|
'37 Aprilia
'50 B10
'53 B20
'68 Flavia Vignale
'55 Giulietta Sprint
S1 Land Rover
|
|
|
chriswgawne
Permanent resident
 
Posts: 2091
|
 |
« Reply #80 on: 24 March, 2018, 08:05:30 AM » |
|
I would be interested to see a photo of your clutch assembly as in my box of 'Aurelia clutch bits' I have parts of what I think is an early B10 clutch in which the steel sprung driven plate is splined on the outside ( so it moves in and out on the splines unlike the driven plate on later clutches which is 'unsplined').
I am missing the 'cover plate' for this early clutch but I don't really know exactly what I am looking for?
It doesn't keep me awake at night but nevertheless I wonder when and why the design was changed.
The later more common version has the torsional loads transmitted through the clutch springs (not the splines as there aren't any on the driven plate) in fact which sounds awful but it works.
I assume therefore that the splined driven plate early design had problems, probably due to splines not sliding smoothly.
Chris
|
|
|
|
|
 Logged
|
Chris Gawne
Mobile: 07778 216552
|
|
|
williamcorke
Rebel Poster

Posts: 718
B10
|
 |
« Reply #81 on: 24 March, 2018, 09:19:45 AM » |
|
Here, for Chris, is a photo that shows some of the clutch parts. I marked it because I needed to return the modern disk as its centre section 'C' was too large in diameter to fit into the pressure plate recess 'B'. The original disk's centre section ('A') does fit. The original disk has now been relined. No springs in the original disk, as you can see, so I'll prepare myself to experience some problems in use.
The aluminium cover plate with spring recesses (bosses on the back) can be seen top left.
|
|
|
« Last Edit: 27 March, 2018, 08:43:33 AM by williamcorke »
|
 Logged
|
'37 Aprilia
'50 B10
'53 B20
'68 Flavia Vignale
'55 Giulietta Sprint
S1 Land Rover
|
|
|
GG
Megaposter

Posts: 572

|
 |
« Reply #82 on: 24 March, 2018, 06:07:13 PM » |
|
Just FYI - I think there maybe are two versions of the early clutch disks -Iím not home now but I think the early ones are ~180mm diameter, but come in varieties. One fit my early B20 trans, one didnít. Something was different about the height of some internal part.
|
|
|
|
|
 Logged
|
Appia C10, Flavia 2000 coupe, Fulvia Fanalone
|
|
|
williamcorke
Rebel Poster

Posts: 718
B10
|
 |
« Reply #83 on: 24 March, 2018, 06:35:10 PM » |
|
Some significant progress today. Clutch compression - £1.50 spent at the local hardware store - 3 x 7cm M6 bolts and 3cm diameter penny washers. The technique is very simple and requires surprisingly little force. This is another (yet another, you might say) example of how displaying my ignorance on the forum led speedily to enlightenment. Here's the plate and cover (springs between the two) with the 'tool' in use: 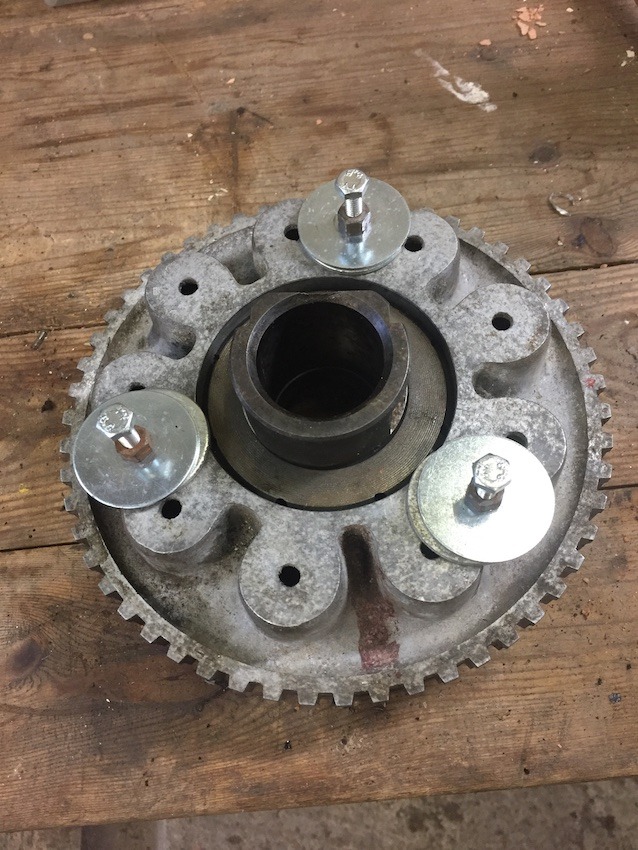 With that done, and the clutch plate centred by eye (or using an 'eyecrometer' as my helper for the day, Andrew Thorogood informed me), the clutch assembly was soon on the end of the gearbox, with the final pull into position accomplished by attaching the clutch actuating arm and giving a hard tug on it. An initial turn of the propshaft 'paddle' end on the clutch 'nose' (seen below) rather worryingly caused the unit to oscillate eccentrically, but pulling harder on the clutch lever stopped this. The plate hadnít been fully centralised (eyecrometer not as accurate as it used to be), but when freed, found its correct position.  Next was the installation of the transaxle/clutch under the car. The only real snag we hit here was that the two crossmembers (numbers 8 and 9 in the Tav. below) were mounted the wrong way round laterally (lhs on the rhs). As they are inclined from vertical (the fixing bolts lean forward or backward towards or away from the front of the car) by c. 5 degrees) there was no way the bolts would all go into their holes until the error was figured out. More learningÖ 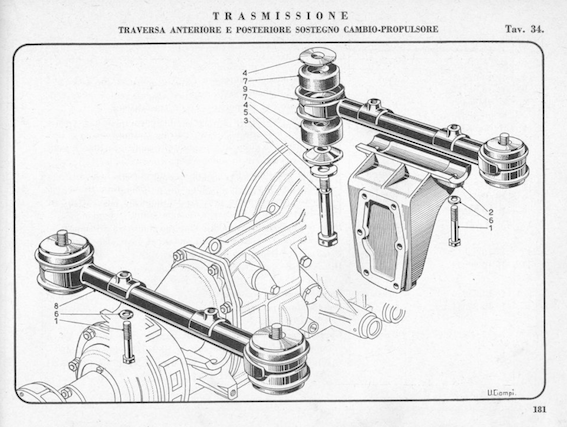 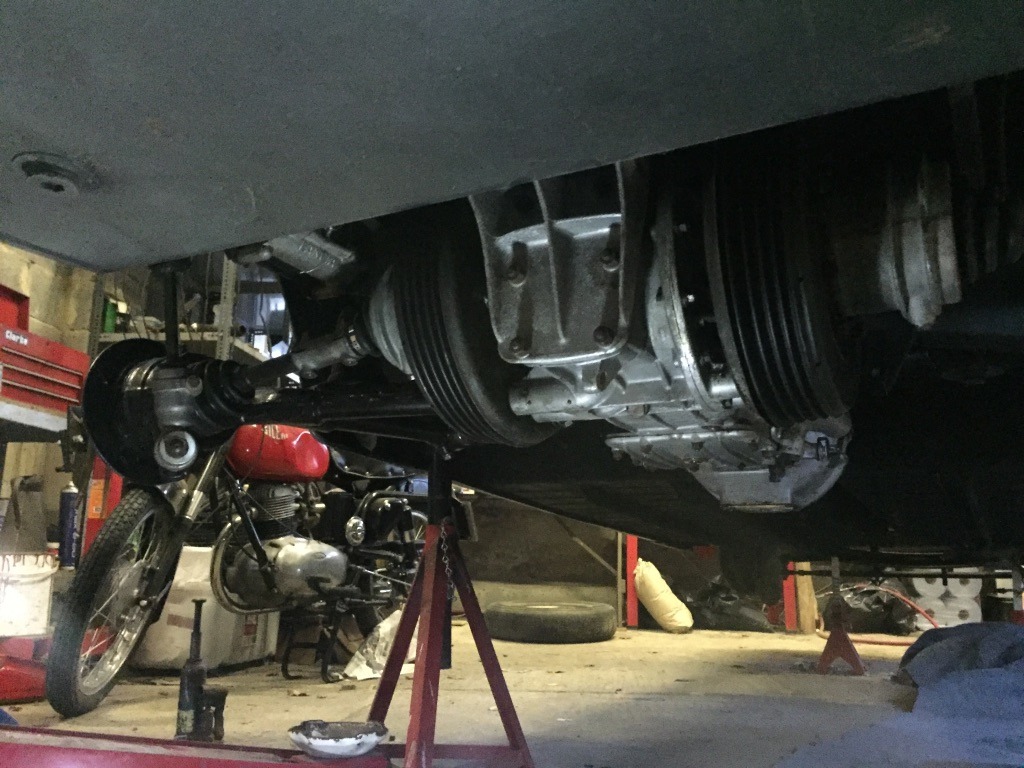 Then on to the rear suspension. There has been some discussion on the forum about how to set the position of the lever arm lever on the splined input shaft. The photo here shows that there are clear marks on both shaft and lever. When aligned, the upper and lower limits of movement (around 90 degrees in total) are where you would expect them to be, so Iím hoping that the obvious fitting position is correct. 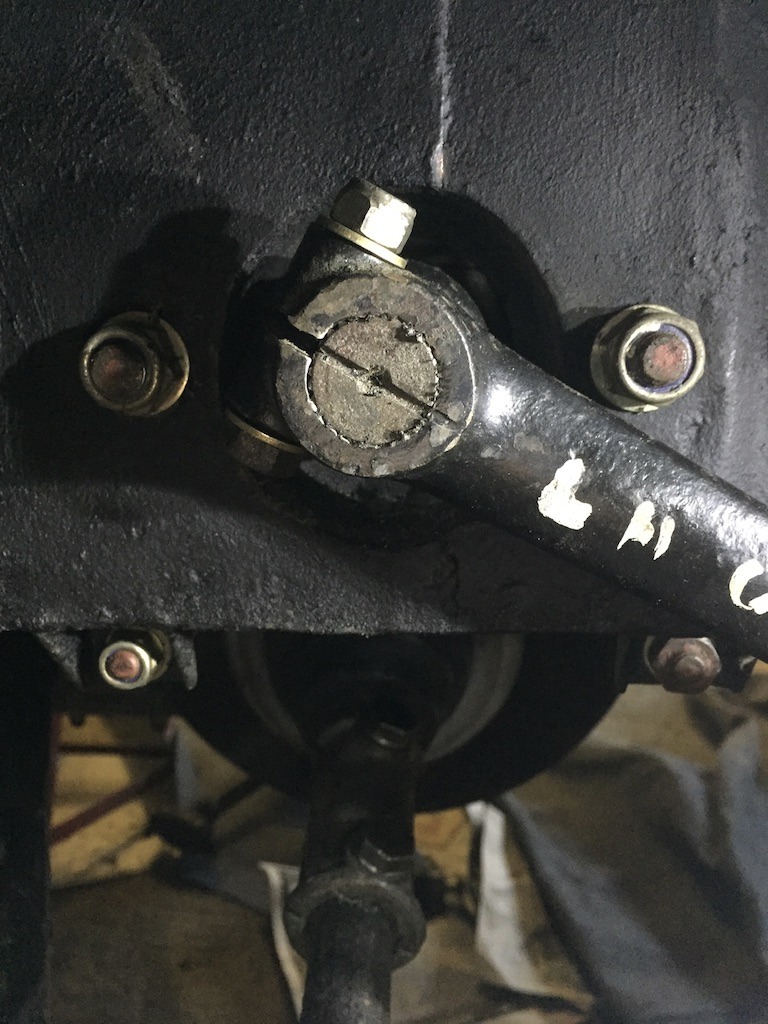 As a footnote on the subject of the lever arm fitting (added later)... when I came to fit the other side, there was not a line on the splined shaft and no mark on the arm either. Luckily I could check the left hand side seen above to see the limits of the arm's movement. The total angular movement is c. 80-90 degrees, and the halfway point is horizontal. This makes sense to me, as this will give the closest to a consistent - linear - damping response (the position on the circumference will effectively change the 'gearing' of the damping, I'd suggest). |
|
|
|
« Last Edit: 27 March, 2018, 08:48:28 AM by williamcorke »
|
 Logged
|
'37 Aprilia
'50 B10
'53 B20
'68 Flavia Vignale
'55 Giulietta Sprint
S1 Land Rover
|
|
|
DavidLaver
Permanent resident
 
Posts: 4388
|
 |
« Reply #84 on: 24 March, 2018, 10:52:08 PM » |
|
Cross members on the wrong way - how long did that take to work out? Made me smile with how understated you were describing that. Its billed as the only real snag, which begs the question as to what turned out to not be snags but took time?
|
|
|
|
|
 Logged
|
David Laver, Lewisham.
|
|
|
DavidLaver
Permanent resident
 
Posts: 4388
|
 |
« Reply #85 on: 24 March, 2018, 10:53:21 PM » |
|
....I spent the afternoon looking for teeny tiny bits of bike brakes that found their ways under the bench or into boxes of bits...
|
|
|
|
|
 Logged
|
David Laver, Lewisham.
|
|
|
williamcorke
Rebel Poster

Posts: 718
B10
|
 |
« Reply #86 on: 25 March, 2018, 08:32:13 AM » |
|
Cross members on the wrong way - how long did that take to work out? Made me smile with how understated you were describing that. Its billed as the only real snag, which begs the question as to what turned out to not be snags but took time?
There was a bit of "why won't the b****y holes line up" expression, but I think it was probably only about 5 minutes before I figured it out. Removing and putting the crossmembers back in the correct positions another 5 - the bolts hadn't been lock-wired yet, but are now. Quick question for you David; can you see the photos in my last post? I've been struggling with the photo-posting capabilities of the Forum. The standard upload only allows them in a group after your text, which is a bit unsatisfactory (in my view). I used google photos and grabbed image URLs - but using an incognito browser to check (not logged into google) the images didn't show on the post. I've now put them in a Drpbox shared folder. So, are they working for you now and were they before? |
|
|
|
« Last Edit: 25 March, 2018, 10:26:34 AM by williamcorke »
|
 Logged
|
'37 Aprilia
'50 B10
'53 B20
'68 Flavia Vignale
'55 Giulietta Sprint
S1 Land Rover
|
|
|
chriswgawne
Permanent resident
 
Posts: 2091
|
 |
« Reply #87 on: 25 March, 2018, 10:02:33 AM » |
|
Cant see any of your recent photos William?
Chris
|
|
|
|
|
 Logged
|
Chris Gawne
Mobile: 07778 216552
|
|
|
williamcorke
Rebel Poster

Posts: 718
B10
|
 |
« Reply #88 on: 25 March, 2018, 10:25:49 AM » |
|
Cant see any of your recent photos William?
Chris
Try refreshing the page Chris - I've put the photos somewhere else online and I think they might now appear. Were you able to see the earlier photo of the clutch disk? |
|
|
|
|
 Logged
|
'37 Aprilia
'50 B10
'53 B20
'68 Flavia Vignale
'55 Giulietta Sprint
S1 Land Rover
|
|
|
the.cern
Permanent resident
 
Posts: 1494
|
 |
« Reply #89 on: 26 March, 2018, 09:32:16 AM » |
|
Hello William, I can see all the photographs except those which accompanied the 'metalwork meets woodwork'!!!
I am hoping that I will remember that the transaxle support members are handed ..... it is great to pick up these tips on the forum!!! However, I have to get a lot of non Lancia work off my plate before I may return to the workshop so it may a while before my memory is tested!!!!!!
Good luck with your ongoing work, Andy
|
|
|
|
|
 Logged
|
|
|
|
|

